So it’s time for the first post!!!
It all began when my mom sent me to another IT job at her friend’s house 😑.
The job was pretty simple – increase the WiFi range in the house.
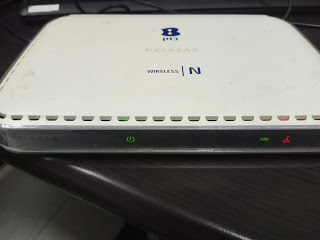
After the job was done, her friend offered me her previous router, so this piece of junk was thrown away in my room for a while 😕
The Attack Surface
Simple routers usually don’t mess with the packets that they route, so taking this route will probably end me up with nothing.

I connected my computer to the router, turned it on, and scanned it with Nmap.
Like most of the home-intended routers, this router offers a WEB-based administration panel.
That’s great because WEB applications don’t mix very well with low-level software. This will be the lead for this project.
Finding the Code
The router is NETGEAR VVG2000, firmware version 2.7.31

There is plenty of data like test reports(with pictures), user guides and much more online.
Now I need to find the firmware, specifically the WEB server-side logic of it.
Time to break stuff 😈
SoC – System on Chip, contains the microprocessor, memory, controllers, and sometimes storage.
It is the ❤ of the chip.
Flash – Chip’s storage. Contains the firmware.
On boot, the program load’s to the RAM in a process called shadowing. (In order for the SoC to process it)

DRAM- Dynamic volatile memory, needs the power to preserve its state. Located at the back of the board.
The SoC can read and write to it.
It contains runtime data (code, configurations, etc..)
SoC – System on Chip, contains the microprocessor, memory, controllers, and sometimes storage.
It is the ❤ of the chip.
Flash – Chip’s storage. Contains the firmware.
On boot, the program load’s to the RAM in a process called shadowing.
Spawning The Shell
Finally, I got to the datasheet of the SoC (Broadcom BCM6368KPBG):

Sharp eyes will immediately notice the UART on the bottom right and the EJTAG in the top right.
UART and JTAG are common debugging interfaces used by the manufactures to test their devices.
These interfaces are extremely important to an attacker because they can (though not always) provide Shell access to the OS, which contains our
target – the WEB server-side code ✌.

I will focus on UART.
Now it’s time to scan the PCB for the UART connection.
Common UART interface usually contains four connection points:
– Ground (GND)
– VCC (Power)
– Transmit (TX)
– Receive (RX)
The goal is to find a series of connection points.
They usually reside at the end of the PCB for convenience.
After the connection has been found, the connection ports need to be categorized.
This procedure is usually done with a multimeter.

VCC – black to ground, red to the suspected point. Usually 3.3V/1.8V/5V.
TX – same procedure, only with changing voltage (when data is sent no voltage is applied)
RX – not much that a multimeter can do. Need to Bruteforce 😒
It goes without saying that RX connects to TX and vice versa.
For this board, the main UART interface is UART1 and the preset is:

Now it’s time to weld the headers to the right points and connect them to a UART connector.
I don’t think that I can explain how to weld on paper, there are a lot of great videos about it so you will be alright.
Then connect the UART connector to a computer and configure com port connection via putty (standard baud rates – 9600, 14400, 19200, 38400, 56000, 57600, 115200).
This procedure might take time and be a little tedious, but it’s worth the effort.
After you did it properly, you will get a lot of information about the system like hardware specs, memory addresses, partitions, etc…
You’ll be thrown directly into the shell with root privileges 🙂
This will not happen all the time because it’s manufacture dependent.
Let’s copy the files.

Hack The Planet
So we looking for CGI files (the bins that contain the server logic).
The first instinct was to look in the www directory.
But there is nothing in there! Just some htm, gif and jpg files.

Where is the server logic?
The daemon responsible for managing the web interface is httpd.
Perhaps the logic is cooked into it…
Strings output on the /usr/sbin/httpd gets us –
This indicates that the assumption is true.
Time to inspect the httpd file.
The file is a standard ELF file compiled to MIPS architecture.
Dropping it to IDA and going over the functions the one that immediately pops up is base64decode because it usually used to decode the username and password.
One X-ref into it and we find this:

The login server-side function. Interesting.
Now, the obvious thing is to check the branches leading in order to see how the program determines if authentication is needed.

Before these branches the function that the program used to compare the URL in order to determine if authentication is needed was strncmp.
Now, it changed to strstr!
This function locates a substring in a given string.
That means that any valid URL that contains one of the strings above will BYPASS THE AUTHENTICATIONFUNCTION.
How will we do it? By adding one of these strings in the URL parameters.

PWNED
After checking it out, it seems that this vulnerability applies to many other NETGEAR routers.

So…
I had a great time working on this post.
The entire hardware needed for the procedure can be found in any electronics shop or eBay.
Hope you enjoyed!
Feel free to ask questions and send requests.
Special thanks to my parents, Rick and Morty, the god of routers and to the cybernetic dimension.
Until next time,
mdh 😀
Resources:
https://blog.senr.io/blog/jtag-explained
http://jcjc-dev.com/2016/04/08/reversing-huawei-router-1-find-uart/
http://index-of.es/Varios-2/The%20Hardware%20Hacker.pdf
https://www.digitalwhisper.co.il/files/Zines/0x50/DW80-1-EmbeddedHacking.pdf
https://www.digitalwhisper.co.il/files/Zines/0x47/DW71-1-DGN.pdf
https://openwrt.org/toh/netgear/dgnd3700
https://www.youtube.com/watch?v=_aedd8SUBgY
Comments are closed